Installation Steps
TCET Linux Installation Steps element is a step-by-step guide created by us that will walk you through the process of installing TCET Linux on your system. We have included all the neccessary steps from Initial Welcome Screen to selecting your Location, Keyboard Layout, Storage Partitioning, and User Details. This Section in the TCET Linux Website helps the user to easily install TCET Linux on their Device.
Here's how we implemented code of this Element :
Function Defination
Opening the "InstallationSteps.jsx"file.
In Installation Steps Element, We have implemented a
codethat consist aReactcomponent called InstallationSteps. It is a functional component that renders a set of installation steps for TCET Linux Installation along withCorresponding Imageswith Hovering Effect.InstallationSteps.jsx//import dependencies
function InstallationSteps()
const [imageFirst, setImageFirst] = useState(welcomeImage);
const [imageSecond, setImageSecond] = useState(welcomeImage);
//Futher CodeOur implemented
codebegins with importing the necessary dependencies and several image files using relative paths for ourRequirements.We have defined InstallationSteps function as the component.
Inside the component, two State Variables are initialized using the
useStatehook: imageFirst and imageSecond.The imageFirst
statevariable represents the image displayed on theLeft side, and imageSecond represents the image displayed on theRightside.
Array Defination
In this
step, we have defined an TwoArraycalled installationStepsFirstSet and installationStepsSecondSet. These arrays contain objects representing the installation steps.First Array contain the objects for
First Setof Installation Steps component. Similarly Second Array contain the objects forSecond Setof Installation Steps component.InstallationSteps.jsx//function defination
const installationStepsFirstSet =
{
id: 1,
header: "Welcome Screen",
description:
"Launch the installer by searching for 'Install TCET Linux'. The installer will look like this.",
image: welcomeImage,
},
//Futher codeEach step object has properties such as id, header, description, and image which represents step number, step title, step description, step image file path.
Similar Steps were carried out by us to create different object in both the Arrays.
We created this Arrays to utilise in Main Structure, which shorten's the code length and make it accessible to understand.
You can refer this code from "InstallationSteps.jsx" file from our TCET Linux Website repo.
Sets of Installation Steps
This Component consist of the main Structure of code implemented by our team which enable the Sets section with hovering image effect.
//Main Structure
<div id="installation" className="overflow-hidden bg-[#101828] py-4 px-4 lg:px-12">
<div className="">
<div className="py-12 px-6 w-full h-full flex flex-col-reverse xl:flex-row md:flex-row">
<div className="w-full xl:w-1/2 relative">
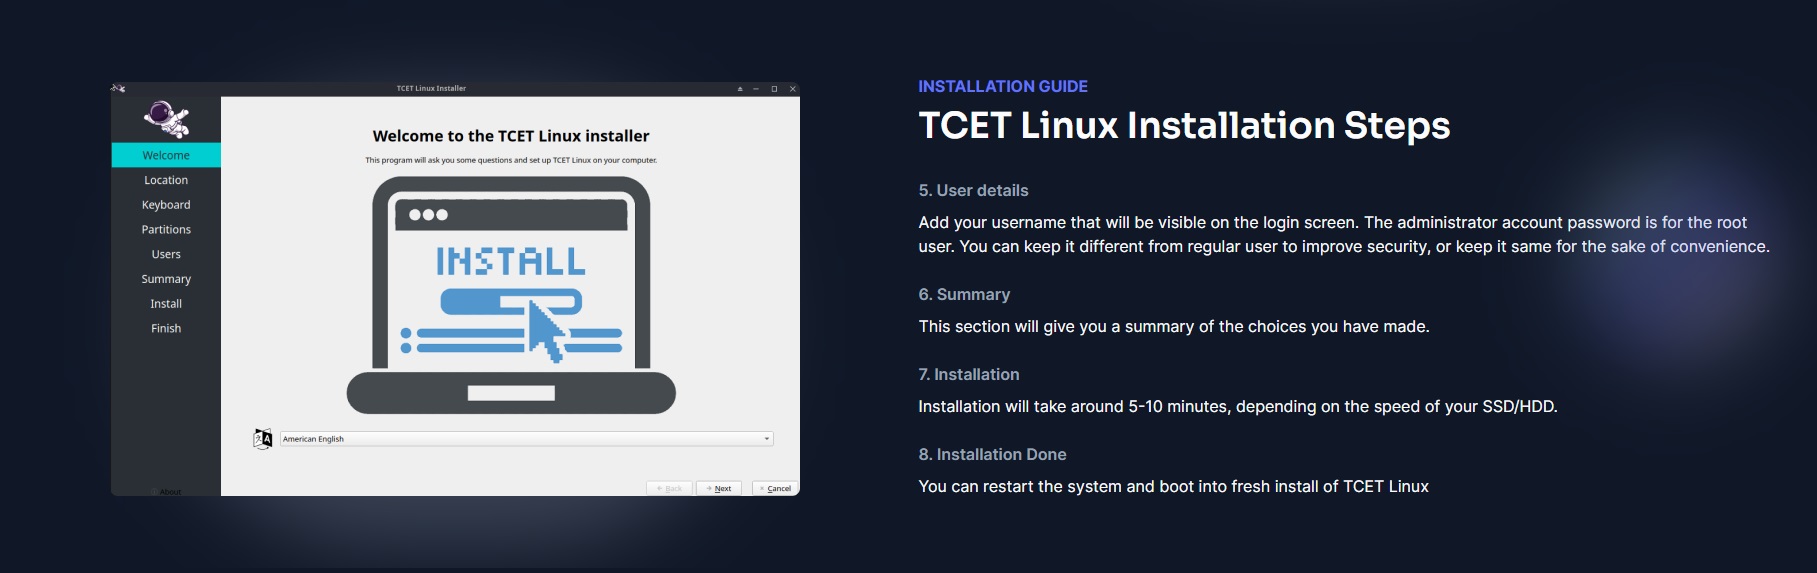
<p className="text-[#6172F3] font-bold">INSTALLATION GUIDE</p>
<p className="font-title text-[#FCFCFD] text-2xl md:text-4xl pt-2 pb-2">
TCET Linux Installation Steps
</p>
<div className="absolute z-30 top-14 left-0 w-48 h-80 bg-gradient-to-r from-teal-100 via-indigo-500 to-pink-100 opacity-30 blur-2xl flex-none order-4 rounded-xl transform -rotate-45"></div>
<div onMouseLeave={() => setImageFirst(welcomeImage)}>
{installationStepsFirstSet.map((step) => (
<div
className="pt-6 cursor-pointer text-sm sm:text-base"
onMouseEnter={() => setImageFirst(step.image)}
key={step.id}
>
<p className="text-[#98A2B3] font-semibold">
{step.id}. {step.header}
</p>
<p className="text-[#F9FAFB] pt-2">{step.description}</p>
</div>
))}
</div>
</div>
<div className="relative w-full flex justify-center align-middle xl:w-1/2">
<div className="absolute z-30 top-5 w-48 h-52 xl:w-[600px] xl:h-[450px] bg-[#98A2B3] opacity-30 blur-2xl flex-none order-4 rounded-full"></div>
<div className="z-50 flex align-middle rounded-xl m-2">
<img className="w-full object-contain rounded-lg" src={imageFirst} />
</div>
</div>
</div>
</div>
// Similar Set section Code
Here's the explanation of the code :
We defined a JSX is wrapped in a
<div>element with the id set to "installation" and some CSS classes for styling purposes.Within the component, we defined the JSX structure which is divided into two main sections for the first and second sets of installation steps.
In the first section, we created a
<div>elements containing another div's for the left side content and the right side content.Inside the left side
<div>, we created a paragragh tag (<p>) element for the title, a<p>element for the description of the installation guide and an<img>element that displays the image corresponding to the currently selected step. Theimagesource is controlled by the imageFirststatevariable.The installationStepsFirstSet
arrayis mapped over to render each step as a<div>. The onMouseEnter event is used by us to update the imageFirststatevariable with the corresponding image when a step is hovered over.
Similar Steps were carried out to created another set of InstallationSteps.
Using this Syntax of Javascript Language, Multiple Sets can be created as per your Requirements.
After implementing all components, the Installation Steps Component can be scene like this :

In this page, we saw how the Installation Steps section was put together. Let's go on towards the next stage,the Verify Downloads Section , to see how the component was implemented.