Define Cycles
The key segment of the webpage, known as the "Defining Cycle" section, is positioned at the upper center of the webpage, just below the "Fill My Cycle" header and the "Need Help" button. It holds significant significance as it serves as the primary interface for users to input their preferred cycles and marks for individual practicals. This particular component is primarily divided into three distinct sections: the allocation of cycle numbers, the input of marks, and the calculation of the average.
Cycle Numbers
Within this specific section of the page, users have the ability to determine the quantity of cycles for both Cycle 1 and Cycle 2. Following the entry of these values, corresponding boxes are displayed beneath each cycle, enabling the user to input marks for each practical within those cycles.
Here's the implemented code:
<div class="row">
<div class="col-xs-6">
<table class="mrg ind">
<thead>
<tr>
<th colspan="2">Cycle 1</th>
</tr>
<tr>
<th><span id="c10">1</span> to </th>
<th><input class="form-control input-sm" type="number" min="1" max="15" step="1" value="" id="c11" maxlength="2" /></th>
</tr>
<tr>
<th colspan="2"><hr></th>
</tr>
</thead>
Now let's understand the code given above:
The first line of code
<div class="row">means we are starting a new row on the paper.Inside that row, we have another part that is divided into two equal columns. This part is represented by the code
<div class="col-xs-6">.The code
<table class="mrg ind">is used to create a table and mrg ind is used to make it look nice. We have defined a header here titled "Cycle-1".The code
<span id="c10">1</span> to </th>means that the first box should show the number 1, and then there should be some empty space and the word "to", like "1 to". The second box is for you to fill in any number you want between 1 and 15, which is given by the code<type="number" min="1" max="15" step="1" value="" maxlength="2" />.Finally, we have another small row with a line in the middle. The code
<th colspan="2"><hr></th>means that we want a line to go across the whole table.
Marks entry
This section is really important because it's where the user enters their practical marks in boxes. But here's the interesting part: only the exact number of boxes that the user asks for will be shown. This means that the interface adjusts itself to match the user's needs.
Here's the code implemented:
<tbody id="tbl01">
        <tr>
            <td>1</td>
                td><input class="form-control input-sm exp" type="number" min="0" max="100" step="1" maxlength="3"/></td>
            </tr>
             // Exactly the same code just it's created for new rows
</tbody>
Inside the table body, there are several rows, each defined by the
<tr>tags. Each row consists of two cells or columns. In the first cell<td>1</td>, the numbers 1, 2, 3, 4, and 5 are displayed in sequential order for each row.The second cell
<td><input class="form-control input-sm exp" type="number" min="0" max="100" step="1" maxlength="3"/></td>contains an input box. This input box allows the user to enter a number between 0 and 100. The input can only be a whole number with a maximum of three digits.tipIn the same way we created all the boxes for Cycle-2. Refer here
Average
This particular section performs a straightforward task of computing the overall average of the marks entered by the user.
<td>Average</td>
    <td>
            <input class="form-control input-sm ip" type="number" min="20" max="100" step="2" id="ip1" />
    </td>
    </tr>
This code basically creates a section with a table displaying an "Average" label and an input box where the user can enter a number or users have the option to manually enter a number in the input box, or alternatively, the computer can automatically calculate the average using values provided by the user.
New Feature!
This feature has been recently added to the website wherein the users can directly input cycle results in the form of ticks and can completely avoid the defining cycle section.
<div class="row">
    div class="col-xs-12">
        <label>
            <input type="checkbox" id="man_mode" />
                Manual Check Input Mode
        </label>
               <button class="btn btn-success btn-xs instr-ref">New Feature!</button>
        </div>
</div>
Here's the breakdown of the code:
The first element is a checkbox input
<input type="checkbox" id="man_mode" />. This checkbox allows the user to select or deselect it. This is linked to thescript.jsfile, which on clicking takes the user directly the display results section.The second element is a button with a class
btn btn-success btn-xs instr-ref. This button is styled with the "btn-success" class to give it a green color, and "btn-xs" class to make it smaller in size. The button is labeled as "New Feature!".On clicking New Features, it takes the user to the footer section, where the Instructions are provided.
After adding the Cycle Numbers, Marks Entry, Average and the New Feature overall defining-cycle looks like this:
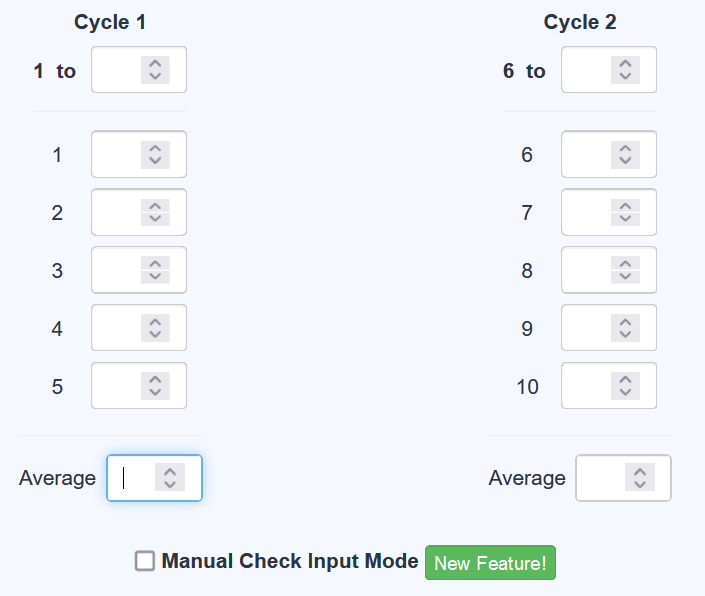
The Defining Cycle is succesfully executed! Let's move on and see how we created the Displaying Cycles of the Fill My Cycle.